Serving the Greater Austin, TX Area
Our Studio is located in Jonestown, TX 78645


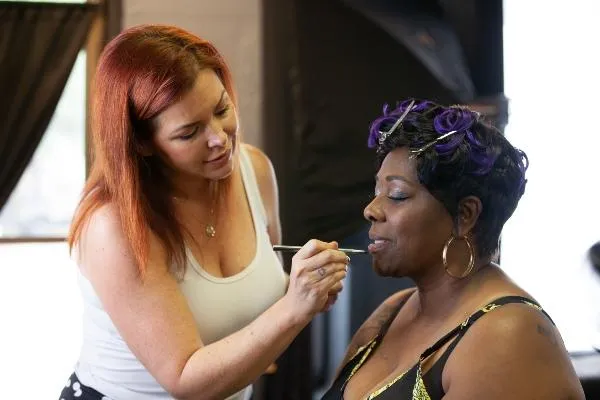
Interview With My Fav Makeup Artist Kellie! + Bonus Makeup Tutorial
Booking a boudoir photography session is a big deal, it’s exciting! Every minute of my time is spent making you feel confident and beautiful in the skin that you’re in. But I have to be honest, let’s not forget to give credit to the makeup artist that I work with; she makes you look gorgeous and feel fabulous!
The thing is you need to go into a boudoir session looking and feeling your best, that way your best self will be reflected back in the final portraits. Makeup artists like Kellie Outlaw know just how to make that happen! I mean, her magic provides amazing results every single time. Plus, she’s super easy to work with. Let’s just say, it’s girl time when you sit down in her makeup chair. The combination quite literally blows me away.
Listen, I love my boudoir girls so much. I appreciate Kellie to the moon and back. Because of this, I’ve decided to conduct an interview with my fav ever makeup artist! Just keep on reading to get some insight into the world of makeup (and to access a free makeup tutorial).

Maggie: To jumpstart our convo, I’d like to tap into your brain. What’s a very common mistake people make when they’re doing their makeup?
Kellie: Ah, I would say people expect to be able to do something right away. Like, they think that seeing it one time in a video or doing it one time on their face will provide immediate results. Like they’ll get it done right the first time.
It honestly takes practice. When I teach my makeup lessons, I always tell people they have to practice. I highly suggest practicing right before you get in the shower. If you want to learn how to do a winged eyeliner, do it before you hop in the shower. That way if you do a terrible job, you can laugh it off and keep going. The more practice the better it’ll come out.
M: That’s very wise advice. You really can’t just “get it” the first time you try an eyeliner or lipstick look - it takes practice! The more practice you get, the better the outcome.
K: Right, you can do it bad, laugh it off and keep on moving.
Another common mistake I see people make is their automatic need to redo everything on their faces. You know when you get in the habit of doing makeup one way and then you decide you want a fresh look? Don’t redo everything immediately. This can potentially give you a new look that doesn’t resemble you whatsoever. I think it’s really all about taking baby steps.
If you want to change your makeup at a high impact level, try adjusting your eyeshadow first, just add a couple more colors. It’s all about color combinations! Some people are ok with using two or three distinct colors, but I’m comfortable with using up to eight. Earlier today, I used silver and brown on Maggie and it looks absolutely beautiful.
I would say if you want to change your look, start with eyeshadow and maybe add a little darker lip than you’re used to. Baby steps.

M: I totally agree with you, Kellie. I know we all want to look our best and feel amazing. The key to that is using your makeup properly so that it enhances what already makes you unique!
My next question is somewhat hypothetical. Say I only have five minutes to get ready, how can I look fabulous and beautiful at the same time?
K: You need to use makeup that will leave an impact! I would say a little bit of concealer under your eyes, a nice juicy color on your lips, and then load on that mascara and you’re out. If you have a little extra time, maybe just add a pinch of blush. Just use your finger and dab some blush; it’ll make you look alive and youthful, ready to go about your day!
M: Perfect answer. Next is do you need to have high-end makeup to look great?
K: In some cases, high-end makeup does work better. But for the most part, there are a lot of really good drugstore makeup brands that work well. An inexpensive option that you can get at Walmart, HEB or Amazon is e.l.f., and they have a lot of great foundations, concealers, and brushes that are easy enough to venture out in. I would say to go for something like that and make sure you like what you’re doing before you invest in very expensive makeup.
If you’re going to invest, I would say eyeshadow palettes are your best bet. There’s nothing worse than buying an inexpensive eyeshadow palette, putting it on, and barely seeing the colors as soon as you brush them on. You want something that has some pigment to it. I use “Colourpop,” and they have pretty good pricing.
M: I have to say, Kellie is so amazing with eyes. She really knows how to make them pop and shine. Her eye makeup enhances the richness of her palettes, and it brings out the natural beauty of all my clients. Her color combinations are truly incredible. So many people don’t often think how important these different elements are in makeup, but she totally does.
Another question I have for you is this, what's your favorite thing about being a makeup artist?
I can honestly say that all my clients love getting their hair and makeup done, it gives them a chance to relax and feel pampered. Plus, Kellie’s super fun to be around, which makes the appointment fly by.
K: Wow, we’ve worked together for almost three years now! I have to say I love how much you take care of and love your girls, and I really appreciate the chance to love them, too. Sure, they come into the session a little nervous, but we have lots of laughs, we get to listen to music, and I get to play makeup artist!
I’d say my favorite thing about this gig is that I get to show people a version of themselves they’ve never seen before. It’s such an inspiring gift to give and I’ve seen the outcome of your photography sessions. Giving them empowerment makes them feel like they can do anything in the world.

M: I have to 100% agree with you, Kellie. At each session, the confidence shows - sometimes with a bit of sass! The girls do often come in nervous, but after their makeup sessions, it’s like the ladies transform themselves; they feel amazing and they’re ready to do this!
Is there any way you can teach me to do this lovely makeup on myself?
K: Absolutely!
I do makeup lessons. I do one-on-one’s. I can send you a list of things to add to your makeup bag. I can send you recommendations before a session so that you can have them on hand and ready to go.
Really, I can show anyone the different features of their face. Do a little face mapping to tell you where your lines are and where things need to go. From there, a one-on-one can be conducted and I can sit on the side of you to guide you along the way. That’s where the learning begins, you do it and I can stand there helping you every step of the way. I even do group get-ready or group lessons if that makes anyone feel more comfortable.
Once, I had a bunch of sisters set up around a dinner table. I gave them all a lesson by having them follow my moves - I did the makeup on myself while they did the makeup on their faces. It was so much fun; we were drinking wine and they were learning about makeup, and at the end of it, we had a little photoshoot.
I get it all the time. People hire me when they go out on the weekends and they want to get some attention. There’s really nothing I don’t do makeup for. I’m always happy to teach or do. We can even do sessions virtually, it’s never a problem.
Honestly, I love working with Kellie. She knows just how to capture my clients’ natural beauty and make them feel like they’re glowing with confidence and self-love. Kellie makes everyone’s skin look so smooth and soft while still highlighting the best features. I highly recommend her any day.
Check out Kellie’s site here: https://www.kellieoutlaw.com/
Come see us at the studio: Maggie Messer Photography
Boudoir sessions are an opportunity to step out of your comfort zone and step into the world of confidence. Still hesitant and have questions? Contact me and we’ll go over everything.
See scheduling here: https://maggiemesser.com/scheduling
***BONUS*** Makeup Tutorial - Direct Interview With Kellie
Tip One
Begin with your eyes. When it comes to the eyeshadow, I make a mess and end up needing to clean it up later on before I get into the foundation. If I don’t, sparkles go everywhere under the eyes and it becomes a real pain to get out.
Tip Two
Start with the base to make sure your makeup stays on as long as possible. Sometimes, people have veins or discoloration on the eyelids, so starting at the base gives me a neutral palette to start with. Plus, it’ll make your eyeshadow last longer.
Tip Three
Another tip in this bonus makeup tutorial is to use concealer or eye primer. Once you get a nice base coat on, you can start to use concealer or eye primer. You’re going to want to get a sponge and translucent powder. Then, put it all over. It’s very important to do this because it’ll help feather out your eyeshadow later on. The last thing we want to do is apply a dark eyeshadow and then it gets stuck in one spot and we can’t blend it. This action is going to prevent that from happening.
No matter what eyelet I do first, I always start with a little warmth on top and it just looks really pretty. Right in the inner crease with a nice fluffy brush. Then, I’ll start to use a darker, more chocolatey brown in the outer crease like what I’m doing here with Maggie. She’ has these big beautiful eyes and I’m really going to focus on accentuating the sexy round eye she has. In this case, I’ll be doing a V pattern, starting at the bottom and blending my way up into that warm brown I just applied.
Tip Four
Now it’s on to adding different layers and blending!
It doesn’t have to be perfect. I like to add different lawyers as I go. I tend to use a small fluffy, angle brush for the outer corner and my fingers for any added shimmering. On Maggie, I’m going to add in a metallic gray and smudge it onto the center. It sounds a bit odd, but it’ll be great, trust me.
My next step with Maggie will be to take a lighter gray and do the inner corner. To buff the colors out, I’m going to take a tiny brush and select a light cream color. That’ll go right at the top of Maggie’s eyes, right underneath her eyebrows. It’ll give a small highlight shimmer. Then, just add a pop of it right here on the inner corners for some extra sparkle, deepening that dark brown again.
Tip Five
Now it’s onto the eyeliner! I personally like to use an angle brush and black eyeshadow for a small bit of eyeliner on the top lid. It’s like eyeliner but a bit softer, not as harsh. Just be sure to get as close to the lash line as possible.
Tip Six
Onto the eyebrows. Maggie has a really great shape to work with, so I won’t be tweaking too much. I’ll just add a little bit more definition and make sure they’re nice and calm, to frame the eyes perfectly. To start, I’ll brush the rows and go right into using a little bit of pencil. I’m kind of drawing a straight line underneath. This distinct makeup action takes a bit of practice, so get ready to try before shower time!
My straight line that I made on Maggie’s eyebrows does look a bit like a Nike checkmark, so I’m going to go in and buff it out just a little bit. To finish off, I’ll add in some Mac - eyebrow mascara - to keep them in place.
Tip Seven
It’s foundation time. I highly suggest buying a light foundation and a dark foundation. Why? Because in the summertime, our skin is a bit darker and in the wintertime, our skin is a bit lighter. Having two will help you customize your look without spending a ton of money trying to figure out which color is the right one for you.
I start by combining the two colors. At first, it’ll look a little musky, but after I take a sponge and blend, it’ll be better. Do one side of the face before the foundation dries on your face then do the other, like I’m doing with Maggie.
Tip Eight
Always use a concealer. I prefer to use foundation first and then go right into concealer. I use the product directly under the eyes to brighten and lighten the face.
Where should you lay it on heavy? Towards the inner area of the eye. Be sure to let it dry for a second and then blend it with the rest.
If you have more mature skin, you can often get the marionette lines towards the inner area of the eye, be sure to lighten those up. Don’t let your eyeshadow go past this point - the line that goes from the end of your eye to your eyebrow - because then you’ll start to look droopy. Add a bit of concealer in this area to make yourself look lifted.
Tip Nine
I like to use some fake eyelashes for extra definition. I like to put the glue on the end, just a small amount. Like a liner on the lash. Make sure you let it dry for 30 seconds and then go for the application. It’s a bit tricky to do on your own, so if you’re trying that for the first time, may the force be with you.
Tip Ten
Move on to loose powder while your lashes are drying. On Maggie, I’m going to just use a bit of powder on her face. Don’t over-powder! Especially on mature skin, as this could accentuate fine lines.
I like to use an eyelash eyeshadow brush so that I can put the powder exactly where I want it to go. I focus on applying underneath the eye to make sure the concealer stays. I’ll also do the T-zone because it gets a little oily.
Tip Eleven
Contouring is next! I personally like to use a fluffy angle brush and a warm brown shade. I then deepen the color in the area between ear and mouth. It’s kind of like an invisible line you want to look for. On Maggie, I’m going to start with a deeper color towards her ear and then just slightly blend it forward. This will present a more narrow face.
Tip Twelve
It’s time to highlight and blush. I like to take a smaller brush to do the highlighting directly on the cheekbones for a nice glow. Then I go right into the blush; it’s super important not to forget the blush, especially if you have mature skin. In this case, you’ll be looking for a youthful glow.
I’m picking a pretty rose color for Maggie. I’ll take my nice fluffy brush and spread some of the blush in between the contour and highlight in fluid circular motions. Start with these motions closer to the hairline and then blend out for a nice, soft glow. If you think the apples of your cheeks need a little pink, choose a lighter blush and dab it softly.
Tip Thirteen
Last but definitely not least, your lips!
With Maggie here, I did a soft smokey eye so I’m going to do a deep lip color, like a dark burgundy to make her pop.
Kellie did an amazing job, per usual. She’s done all kinds of different looks for my ladies and they’ve all come out gorgeous! Who’s next?
Interested in a glamour or boudoir shoot to showcase what makes you uniquely beautiful? Check out our Website.
https://www.maggiemesser.com/
Maggie Messer Photography is a participant in the Amazon Services LLC Associates Program, an affiliate advertising program designed to provide a means for sites to earn advertising fees by advertising and linking to Amazon.com Some of the links to products on this blog are affiliate links. It simply means, at no additional cost to you, I might earn a commission if you click through and buy any product. Thank you for your support. 😘